How to Attach Jumper Cables to a Car Battery Correctly-Expert Guidance.When a vehicle refuses to start in the UAE, especially during the intense summer months in Dubai, Abu Dhabi, Sharjah, Ajman, and other Emirates, one of the most common emergency procedures is attaching jumper cables to a car battery correctly. While the process may appear simple, a single mistake can damage electronic control modules, alternators, battery sensors, infotainment systems, ECU units, hybrid battery management systems, and even modern ADAS safety components.
Click Here
Table of Contents
For vehicle owners, tourists, fleet operators, luxury car drivers, and commercial transport businesses, understanding how to attach jumper cables safely has become an essential roadside skill.
For drivers who prefer professional roadside assistance, services such as professional jump start service, battery jump start service, and roadside battery assistance Dubai provide rapid support throughout the UAE.
Why Correct Jumper Cable Attachment Matters More in UAE Conditions
The UAE presents unique battery challenges compared to Europe, North America, or colder regions.
Extreme temperatures frequently exceed 45°C during summer, causing:
- Accelerated battery fluid evaporation
- Internal battery plate degradation
- Increased charging system stress
- Higher electrical demand from air conditioning systems
- Faster battery aging
- Unexpected roadside breakdowns
A battery that might last five years in a cooler climate often requires replacement much sooner in Dubai’s demanding environment.
Incorrect jumper cable attachment can cause:
- ECU failure
- Battery explosion
- Electrical surges
- Alternator damage
- Fuse box damage
- Sensor malfunction
- Hybrid system faults
- Vehicle immobilizer issues
This is why EuroSwift Auto Services recommends following manufacturer-approved jump-start procedures whenever possible.
Understanding the Four Components Before Connecting Jumper Cables
Before attaching cables, every driver should identify four critical points.
| Component | Purpose | Identification |
|---|---|---|
| Positive Battery Terminal | Receives charging current | Marked “+” and usually red |
| Negative Battery Terminal | Ground connection | Marked “-” and usually black |
| Positive Jumper Cable | Transfers voltage | Red cable |
| Negative Jumper Cable | Completes circuit | Black cable |
Many luxury vehicles in Dubai now place batteries in the trunk, under seats, or beneath cargo compartments. Manufacturers often provide dedicated jump-start terminals under the hood.
Examples include:
- BMW
- Mercedes-Benz
- Audi
- Porsche
- Range Rover
- Bentley
- Rolls-Royce
Using incorrect connection points can damage sophisticated battery monitoring systems.
The Science Behind Jump Starting a Vehicle
A jump start works by temporarily transferring electrical energy from a healthy battery to a discharged battery.
The donor vehicle supplies:
- Cranking amperage
- Starting voltage
- Initial ignition power
The receiving vehicle uses this temporary power to:
- Activate starter motor
- Power ignition system
- Energize fuel delivery system
- Wake up ECU modules
Once the engine starts, the alternator begins generating electrical power and recharging the battery.
The process depends entirely on attaching jumper cables in the correct sequence.
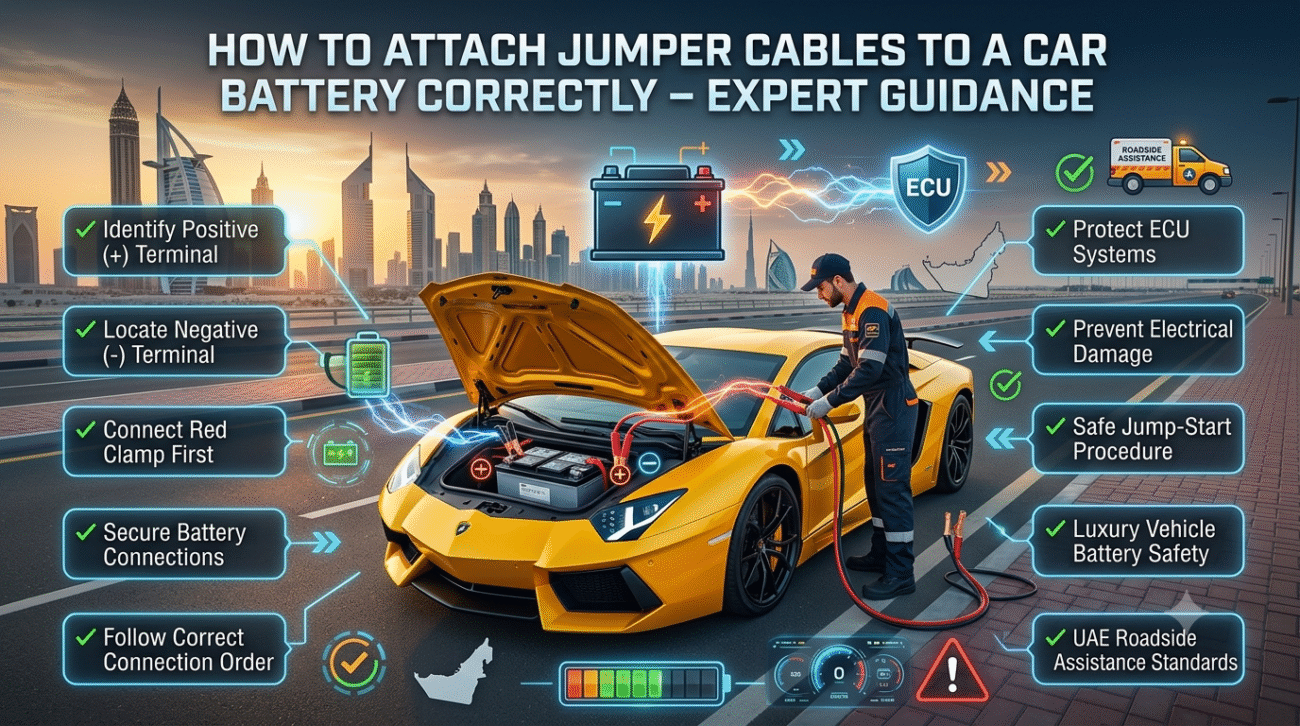
Correct Order for Attaching Jumper Cables
Automotive engineers worldwide follow a standardized connection procedure.
Step 1: Position Both Vehicles Safely
Park the donor vehicle close enough for cables to reach.
Requirements:
- Vehicles must not touch
- Parking brake engaged
- Transmission in Park or Neutral
- Ignition switched off
- Headlights turned off
- Air conditioning switched off
This minimizes electrical load during the jump-start process.
Step 2: Locate Positive Terminal on Dead Battery
Identify the positive (+) terminal.
Look for:
- Red protective cap
- Plus sign (+)
- Red cable connection
Never assume terminal locations.
Always verify visually.
Step 3: Connect Red Clamp to Dead Battery Positive Terminal
Attach one red clamp firmly to the positive terminal of the discharged battery.
Check:
- Secure metal-to-metal contact
- No corrosion interference
- No loose connection
Poor contact creates resistance and heat.
Step 4: Connect Other Red Clamp to Donor Battery Positive Terminal
Attach the second red clamp to the positive terminal of the healthy battery.
At this stage:
Positive → Positive
No other connections should be made yet.
Step 5: Connect Black Clamp to Donor Battery Negative Terminal
Attach one black clamp to the donor battery’s negative terminal.
The donor circuit is now complete.
Step 6: Connect Final Black Clamp to Vehicle Ground
This is the most misunderstood step.
Do NOT connect directly to the dead battery negative terminal.
Instead attach it to:
- Engine block
- Unpainted metal bracket
- Manufacturer-approved grounding point
This reduces explosion risk caused by battery gases.
Professional roadside technicians performing a car battery jump start Dubai service always use proper grounding techniques.
Connection Sequence Summary
| Order | Connection |
|---|---|
| 1 | Red clamp to dead battery positive |
| 2 | Red clamp to donor battery positive |
| 3 | Black clamp to donor battery negative |
| 4 | Black clamp to grounded metal surface |
Following this sequence significantly reduces electrical hazards.
Common Mistakes UAE Drivers Make
Roadside technicians in Dubai report several recurring errors.
Reversing Polarity
Connecting:
- Positive to negative
- Negative to positive
can instantly destroy:
- Alternators
- Battery management modules
- Engine computers
- Sensors
- Fuses
Repair costs may exceed several thousand dirhams.
Connecting Negative Clamp to Dead Battery
Many drivers incorrectly place the final black clamp on the dead battery itself.
Potential risks include:
- Sparks
- Hydrogen gas ignition
- Battery casing rupture
Using Damaged Jumper Cables
Low-quality cables often have:
- Thin copper strands
- Weak clamps
- Poor insulation
Symptoms include:
- Excessive heat
- Slow cranking
- Failed jump starts
Attempting to Jump Start a Damaged Battery
Never jump-start a battery showing:
- Cracks
- Swelling
- Leaking acid
- Burn marks
- Strong sulfur smell
Immediate replacement is recommended.
Special Considerations for Luxury Vehicles in Dubai
Luxury cars contain far more electronics than conventional vehicles.
Examples include:
- Adaptive suspension
- Digital instrument clusters
- Radar systems
- Active steering
- Parking assist modules
- Air suspension controllers
Vehicles frequently requiring specialized jump-start procedures include:
- Mercedes S-Class
- BMW 7 Series
- Range Rover Autobiography
- Porsche Cayenne
- Bentley Bentayga
- Audi A8
Incorrect cable attachment can trigger multiple fault codes.
Many owners therefore choose a dedicated mobile jump start service instead of attempting roadside jumps themselves.
Hybrid and EV Jump Start Precautions
Modern hybrid vehicles require additional caution.
Vehicles such as:
- Toyota Prius
- Lexus RX Hybrid
- Toyota Camry Hybrid
- Hyundai Hybrid models
often contain:
- 12V auxiliary battery
- High-voltage traction battery
Drivers should never attempt to connect jumper cables directly to high-voltage systems.
Only designated jump-start terminals should be used.
Electric vehicles generally do not require conventional jump starts but may need assistance for auxiliary battery failures.
Case Study: Downtown Dubai Parking Breakdown
A resident parked overnight in Downtown Dubai.
Vehicle:
- BMW X5
- Three-year-old battery
Symptoms:
- No crank
- Dashboard warnings
- Weak interior lighting
The owner connected cables incorrectly by grounding to the negative battery terminal.
Result:
- Multiple electronic warning lights
- Battery management faults
- System reset requirement
A professional technician later performed the procedure using manufacturer-approved jump-start points and restored operation.
This example demonstrates why proper cable attachment matters in modern vehicles.
Professional Emergency Response Procedures Used by EuroSwift Auto Services
When responding to roadside battery emergencies, technicians typically follow a structured inspection process.
Battery Health Check
Inspection includes:
- Voltage testing
- Load testing
- Terminal inspection
- Charging system evaluation
Cable Inspection
Technicians verify:
- Clamp quality
- Connection integrity
- Voltage transfer capability
Safe Ground Selection
A proper grounding point is selected based on manufacturer recommendations.
Controlled Engine Start
The vehicle is started gradually while monitoring:
- Voltage output
- Charging rate
- Alternator performance
- Battery recovery behavior
This minimizes risk to expensive vehicle electronics.
Comparison of Jumper Cable Types Used in UAE Roadside Services
| Cable Type | Best Use | Performance |
|---|---|---|
| Economy Cable | Small vehicles | Moderate |
| Copper Core Cable | Sedans & SUVs | Excellent |
| Heavy-Duty Commercial Cable | Trucks & Vans | Very High |
| Smart Booster Cable | Modern vehicles | Advanced |
| Lithium Jump Pack Cable | Emergency roadside service | Premium |
Professional operators providing roadside jump start service generally use heavy-duty copper-core cables for reliable current transfer.
Weather Impact on Jump Start Success
Many drivers assume cold weather causes battery failures.
In the UAE, heat is actually the primary battery killer.
Heat causes:
- Plate corrosion
- Electrolyte loss
- Internal resistance increase
- Reduced battery lifespan
During peak summer:
- Dubai
- Abu Dhabi
- Sharjah
- Ajman
- Ras Al Khaimah
experience a sharp rise in roadside battery assistance requests.
This explains the growing demand for:
- jump start Dubai
- vehicle jump start service
- 24/7 jump start service Dubai
- emergency jump start Dubai
- battery booster service Dubai
across residential communities, malls, business districts, airports, and tourist destinations.
UAE Safety Regulations, Automotive Standards, and Legal Responsibilities During a Jump Start
Attaching jumper cables correctly is not only a technical procedure; it is also a safety responsibility. Across the UAE, roadside incidents involving batteries, electrical systems, and stalled vehicles can create hazards for drivers, passengers, and surrounding traffic.
When performing a jump start on Sheikh Zayed Road, Al Khail Road, Emirates Road, Mohammed Bin Zayed Road, or busy urban areas of Dubai and Abu Dhabi, drivers should first secure the vehicle before opening the hood.
Recommended safety measures include:
- Activating hazard warning lights
- Parking outside active traffic lanes
- Using reflective warning triangles
- Wearing a reflective safety vest
- Keeping passengers away from traffic
- Avoiding jump-start procedures during active fuel spills
Many roadside incidents occur because drivers focus entirely on the battery and ignore surrounding traffic risks.
For this reason, vehicle owners often request a professional auto jump start service instead of attempting roadside repairs themselves.
Understanding Battery Gas Risks Before Connecting Jumper Cables
A modern lead-acid battery produces hydrogen gas during charging and discharging cycles.
Hydrogen gas:
- Is highly flammable
- Accumulates near battery vents
- Can ignite from a small spark
- May cause battery casing explosions
This is the engineering reason the final black clamp should be attached to a vehicle grounding point rather than directly to the discharged battery.
Technicians performing a professional battery jump service understand how to minimize spark generation around the battery compartment.
Battery Explosion Risk Factors
| Risk Factor | Danger Level |
|---|---|
| Damaged battery case | High |
| Acid leakage | High |
| Swollen battery | Very High |
| Overheated battery | High |
| Incorrect cable order | Very High |
| Reverse polarity | Critical |
Any battery displaying these symptoms should be replaced rather than jump-started.
Why Modern Vehicles Require More Precision Than Older Cars
A 1995 sedan and a 2026 luxury SUV are entirely different electrical systems.
Older vehicles typically contained:
- Starter motor
- Alternator
- Ignition system
- Basic sensors
Modern UAE vehicles may contain over 100 interconnected control modules.
Examples include:
- Adaptive cruise control
- Blind spot monitoring
- Lane assist systems
- Radar sensors
- Camera networks
- Air suspension modules
- Battery management controllers
- Intelligent charging systems
Improper jumper cable attachment can affect systems that seem completely unrelated to the battery.
A voltage spike lasting milliseconds may create diagnostic faults requiring dealership recalibration.
Intelligent Battery Monitoring Systems Found in UAE Luxury Cars
Most premium vehicles sold in Dubai now use Intelligent Battery Sensors (IBS).
Common brands include:
- BMW
- Mercedes-Benz
- Audi
- Porsche
- Land Rover
- Lexus
- Genesis
These systems continuously monitor:
- Battery voltage
- State of charge
- Current flow
- Temperature
- Charging efficiency
Improper jump-start procedures can confuse the battery management system, resulting in:
- Battery warnings
- Start-stop system failure
- Charging faults
- Reduced fuel efficiency
- Battery registration errors
This is one reason luxury vehicle owners frequently use a dedicated car jump start service Dubai rather than DIY methods.
How EuroSwift Auto Services Handles Different Vehicle Categories
Not every vehicle should receive the same jump-start procedure.
Professional roadside teams generally classify vehicles into categories.
Passenger Cars
Examples:
- Toyota Corolla
- Nissan Sunny
- Hyundai Elantra
- Kia Cerato
Typical requirements:
- Standard jumper cables
- Conventional voltage verification
- Basic battery testing
Premium Sedans
Examples:
- Mercedes E-Class
- BMW 5 Series
- Audi A6
Typical requirements:
- Manufacturer grounding points
- Electronic system protection
- Intelligent charging verification
Luxury SUVs
Examples:
- Range Rover
- Mercedes GLS
- BMW X7
- Lexus LX
Typical requirements:
- High-capacity booster systems
- Extended battery diagnostics
- Battery sensor verification
Commercial Vehicles
Examples:
- Delivery vans
- Fleet SUVs
- Logistics vehicles
Typical requirements:
- Heavy-duty cables
- High-amperage starting support
- Charging system evaluation
The Correct Waiting Period After Cable Connection
Many drivers immediately attempt engine cranking after attaching cables.
This reduces jump-start success rates.
Professional technicians often allow a short charging period.
Recommended waiting time:
| Battery Condition | Suggested Wait Time |
|---|---|
| Slightly discharged | 1-2 minutes |
| Moderately discharged | 3-5 minutes |
| Deeply discharged | 5-10 minutes |
| Long-term parking discharge | 10+ minutes |
This allows initial voltage recovery before starter motor engagement.
Common UAE Situations That Lead to Battery Failure
Understanding why batteries die helps prevent future emergencies.
Airport Parking
A vehicle left at Dubai International Airport or Abu Dhabi International Airport for several weeks may experience:
- Natural battery discharge
- Security system drain
- Tracker power consumption
Mall Parking
Large shopping destinations such as:
- Dubai Mall
- Mall of the Emirates
- Yas Mall
often generate battery issues because drivers leave:
- Interior lights on
- Dash cameras running
- Accessories connected
Residential Parking
Common causes include:
- Aging batteries
- Infrequent vehicle use
- High summer temperatures
Fleet Operations
Commercial fleets experience:
- Frequent stop-start cycles
- Extended idling
- Heavy electrical demand
These conditions accelerate battery deterioration.
Case Study: Marina Luxury SUV Battery Failure
Vehicle:
Range Rover Autobiography
Location:
Dubai Marina
Symptoms:
- No crank condition
- Air suspension warnings
- Dashboard voltage alerts
Investigation revealed:
- Battery at end of service life
- Previous incorrect jump-start attempt
- Low charging efficiency
Technicians used:
- Approved jump terminals
- Controlled voltage support
- Battery diagnostic tools
Vehicle started successfully and battery replacement was scheduled.
The owner avoided potential electronic module damage that could have cost thousands of dirhams.
Professional vs DIY Jumper Cable Attachment
| Factor | DIY Jump Start | Professional Service |
|---|---|---|
| Cost | Lower initially | Service fee applies |
| Safety | Depends on skill | High |
| Battery testing | Limited | Comprehensive |
| Alternator testing | Rare | Included |
| Fault detection | Minimal | Advanced |
| Luxury vehicle compatibility | Riskier | Safer |
| Hybrid vehicle support | Limited | Professional |
| Response speed | Immediate if equipment available | Usually rapid |
Many drivers searching for a jump start service near me ultimately choose professional assistance due to the complexity of modern vehicles.
Insurance Considerations Following Incorrect Jump Starts
Many drivers do not realize that electrical damage caused by incorrect jumper cable attachment may not always be covered under standard vehicle warranties.
Potential claims may involve:
- ECU replacement
- Alternator replacement
- Wiring harness repairs
- Fuse box replacement
- Battery sensor replacement
Luxury vehicle repairs can quickly exceed the cost of dozens of professional jump-start services.
For this reason, prevention remains significantly cheaper than repair.
Advanced Troubleshooting When a Vehicle Still Won’t Start
Even after cables are connected correctly, some vehicles remain unresponsive.
Potential causes include:
Failed Starter Motor
Symptoms:
- Single click
- No engine rotation
Failed Alternator
Symptoms:
- Vehicle starts but dies again
- Battery warning light
Battery Internal Cell Failure
Symptoms:
- Extremely low voltage
- Rapid discharge
Corroded Terminals
Symptoms:
- Weak electrical flow
- Intermittent starting
Battery Sensor Malfunction
Symptoms:
- Electronic warnings
- Charging irregularities
Security System Lockout
Symptoms:
- Crank disabled
- Immobilizer warning
Professional technicians providing car battery help near me services routinely diagnose these conditions before recommending battery replacement.
Fleet Vehicle Battery Management in the UAE
Corporate fleets increasingly use predictive battery maintenance systems.
Industries benefiting include:
- Logistics
- Tourism
- Ride-sharing
- Corporate transport
- Airport transfer services
Fleet managers monitor:
- Battery age
- Voltage trends
- Starting performance
- Charging efficiency
- Failure probability
This proactive strategy reduces emergency roadside breakdowns and operational downtime.
AI-Powered Battery Diagnostics Transforming Roadside Assistance
Artificial intelligence is becoming a major component of battery management.
Modern diagnostic systems can predict:
- Remaining battery life
- Failure probability
- Charging efficiency decline
- Starter system abnormalities
- Alternator performance degradation
Instead of reacting to breakdowns, AI systems identify batteries likely to fail weeks before the actual incident occurs.
This trend is rapidly expanding throughout Dubai’s automotive service sector.
Smart Jump Start Technology Emerging in UAE Roadside Services
Traditional jumper cables remain effective, but modern roadside assistance increasingly uses:
- Smart lithium boosters
- Reverse polarity protection
- Voltage stabilization systems
- ECU protection technology
- Battery health analytics
Advantages include:
- Faster deployment
- Reduced electrical risk
- Higher compatibility with luxury vehicles
- Better support for modern electronics
As vehicle technology evolves, jumper cable procedures continue to become more sophisticated, requiring greater expertise than ever before.
Most Frequentely Asked Faqs
-
1.What Is the Correct Order to Attach Jumper Cables?
The correct order is very important for safety and to protect your vehicle’s electrical system. First, connect the red (positive) clamp to the positive terminal of the dead battery. Then connect the other red clamp to the positive terminal of the good battery. Next, connect the black (negative) clamp to the negative terminal of the good battery. Finally, connect the remaining black clamp to an unpainted metal part of the vehicle with the dead battery, such as the engine block or a solid metal bracket.
This sequence reduces the risk of sparks and helps ensure a safe jump start. -
2.Do I Connect Black or Red First?
Always connect the red (positive) cable first.
The positive connection is made before the negative connection to reduce the chances of a short circuit. After both red clamps are connected, attach the black clamp to the donor battery’s negative terminal and the final black clamp to a metal grounding point on the vehicle with the dead battery.
A simple rule to remember is: Red first, Black last. -
3.Should Both Cars Be Off When Attaching Jumper Cables?
Yes, both vehicles should be completely turned off before attaching jumper cables.
Make sure the engines, headlights, air conditioning, radio, and other electrical accessories are switched off. This helps prevent electrical surges and protects sensitive components such as the ECU, sensors, and battery management systems.
Once all cables are connected correctly, start the vehicle with the good battery first. Let it run for a few minutes before attempting to start the vehicle with the dead battery. -
4.Which Car Do the Jumper Cables Go on First?
The first connection should always be made to the vehicle with the dead battery.
Start by connecting the red clamp to the positive terminal of the dead battery. Then connect the other end of the red cable to the positive terminal of the good battery. After that, connect the black cable to the negative terminal of the good battery and finish by attaching the remaining black clamp to a metal grounding point on the vehicle with the dead battery.
Following this order helps create a safe electrical path and reduces the risk of damage to either vehicle.
Conclusion-Final Thoughts
Knowing how to attach jumper cables correctly can help you safely restart a vehicle and avoid costly electrical damage. Always connect the red (positive) cables first, followed by the black (negative) cables, and use a proper metal grounding point for the final connection. Both vehicles should be turned off while attaching the cables, and the connection process should always begin with the vehicle that has the dead battery.
If the vehicle still does not start after a proper jump start, the problem may be a failing battery, alternator issue, starter motor fault, or another electrical system problem that requires professional diagnosis. Taking a few extra moments to follow the correct procedure can protect your vehicle, improve safety, and ensure a successful jump start when you need it most.
Instant Guidance
How to Attach Jumper Cables correctly starts with understanding that the process is about controlled power transfer between two batteries, not just physical connection. In UAE conditions where heat and high vehicle usage are common, proper attachment reduces ECU damage risk and improves jump-start success rate.
How to Attach Jumper Cables begins by positioning both vehicles close enough so the cables can reach, but without allowing the cars to touch. This prevents accidental electrical grounding between bodies, which can cause short circuits in modern vehicles.
How to Attach Jumper Cables requires turning off both engines completely before starting any connection. This ensures there is no active current flow, which is especially important for luxury cars and vehicles with sensitive electronic control units.
How to Attach Jumper Cables depends on identifying the correct battery terminals. The positive terminal is usually marked with a plus (+) sign and often has a red cover, while the negative terminal is marked with a minus (–) sign.
How to Attach Jumper Cables correctly always starts with the red clamp. The red clamp is first attached to the positive terminal of the dead battery to begin safe current transfer preparation.
How to Attach Jumper Cables continues by connecting the other red clamp to the positive terminal of the donor battery. This creates a positive circuit link between both batteries.
How to Attach Jumper Cables requires careful handling of the black clamp next. One black clamp is attached to the negative terminal of the donor battery to establish grounding support.
How to Attach Jumper Cables is completed by attaching the final black clamp to an unpainted metal surface on the dead vehicle. This grounding step reduces spark risk near the battery.
How to Attach Jumper Cables should always avoid connecting the final black clamp directly to the dead battery in modern vehicles, as it can create a spark near battery gases.
How to Attach Jumper Cables becomes safer when clamps are securely tightened to avoid slipping during engine cranking. Loose clamps can interrupt power flow instantly.
How to Attach Jumper Cables also requires ensuring cables are not tangled or touching moving engine parts like belts or fans.
How to Attach Jumper Cables works best when the donor vehicle is slightly running before attempting ignition of the dead car, allowing stable voltage transfer.
How to Attach Jumper Cables should be done slowly and step-by-step without rushing, as incorrect sequencing is the most common cause of jump-start failure.
How to Attach Jumper Cables is more effective when both batteries are checked visually for swelling, leakage, or corrosion before connection begins.
How to Attach Jumper Cables also depends on using proper heavy-duty cables suitable for engine size, especially SUVs common in UAE roads.
How to Attach Jumper Cables should include ensuring all electrical accessories like AC and headlights are switched off in both vehicles before connection.
How to Attach Jumper Cables becomes more reliable when clamps are attached firmly in a vibration-free position to maintain steady contact during startup.
How to Attach Jumper Cables requires keeping the metal ends separated at all times before final connection to prevent accidental sparking.
How to Attach Jumper Cables is safest when performed on flat ground, ensuring vehicles remain stable throughout the process.
How to Attach Jumper Cables should always follow a fixed order: positive to positive first, then negative to ground last, to minimize electrical risk.
How to Attach Jumper Cables is most successful when a short waiting period of 2–3 minutes is given after full connection before starting the engine.
How to Attach Jumper Cables also involves checking that the donor battery has sufficient charge capacity (ideally above 80%) before assisting another vehicle.
How to Attach Jumper Cables becomes risky if clamps are reversed, which can damage fuses or electronic modules instantly.
How to Attach Jumper Cables should include ensuring hands are dry and insulated to avoid accidental electric contact during connection.
How to Attach Jumper Cables works better when the dead vehicle’s battery terminals are lightly cleaned before connection to improve conductivity.
How to Attach Jumper Cables also requires keeping passengers away from the engine bay during the process for safety reasons.
How to Attach Jumper Cables is more stable when both cars remain in park or neutral with handbrakes fully engaged.
How to Attach Jumper Cables should always be followed by careful monitoring of dashboard lights before attempting ignition.
How to Attach Jumper Cables becomes a reliable emergency skill when users understand both the sequence and safety principles behind the process.
How to Attach Jumper Cables is widely used in roadside assistance systems in UAE, including professional services like EuroSwift Auto Services.
How to Attach Jumper Cables becomes more reliable when you first check both batteries for visible damage such as cracks or swelling, because physically damaged batteries should never be jump-started due to explosion risk.
How to Attach Jumper Cables should always include confirming that the donor car is parked in a stable position with the engine off initially, especially in tight UAE parking areas where movement can cause cable disconnection.
How to Attach Jumper Cables works best when you ensure the clamp teeth are fully gripping the metal terminals, because weak contact is one of the most common reasons for failed jump-start attempts.
How to Attach Jumper Cables also requires avoiding any contact between clamps and surrounding metal parts of the engine bay, since accidental grounding can trigger sparks or fuse issues.
How to Attach Jumper Cables becomes safer when you slightly shake each clamp after attaching it to confirm it is firmly locked in place before moving to the next connection point.
How to Attach Jumper Cables should include checking that the cables are laid out in a straight path without twisting, because twisted cables increase resistance and reduce current flow efficiency.
How to Attach Jumper Cables is more effective when the donor vehicle has a slightly higher engine capacity than the dead vehicle, ensuring stable current delivery during ignition.
How to Attach Jumper Cables requires avoiding any wet surfaces near the battery area, as moisture can create unintended conductivity paths and increase shock risk.
How to Attach Jumper Cables becomes more controlled when you mentally rehearse the full connection order before starting, reducing the chance of confusion under roadside stress.
How to Attach Jumper Cables also depends on ensuring that both battery terminals are fully exposed, because partially covered terminals often lead to weak or unstable connections.
How to Attach Jumper Cables should always include keeping cables away from the radiator fan and moving belts, especially in modern cars where engine bays are tightly packed.
How to Attach Jumper Cables is safer when you avoid standing directly over the battery during connection, reducing exposure to potential sparks or gas release.
How to Attach Jumper Cables works more efficiently when both vehicles are switched off for at least 30 seconds before connection to stabilize electronic systems.
How to Attach Jumper Cables should always be followed by a quick visual double-check of polarity before final clamp attachment to avoid reverse connection damage.
How to Attach Jumper Cables becomes a professional-level skill when you understand that proper grounding is just as important as positive connection in ensuring a successful jump start.
Leave a Reply